10.31.2011

Buffalo Posole


Around this time of year, I always crave posole, which is a spicy corn stew from Mexico. I first tried this dish when I was on vacation in New Mexico with my family. It was heaven – spicy broth, shredded pork, and huge kernels of hominy. I have, however, had some not-so-heavenly posole while on Spring Break in Mexico, of all places. It was probably due to our choice of going to such a touristy restaurant, but the dish was bland and super duper greasy. Plus, the fact that I had to wear a bikini for the duration of the trip didn’t play very well. Greasy posole + bikini = no bueno.

This buffalo posole is a simpler and healthier version of classic posole, which is typically made with pork shoulder. Now, I don’t know about you, but pork shoulder scares the bejesus out of me (I’m not a very big meat-eater). For this reason, I played it safe with ground buffalo. Bison is a great alternative to other meats not only because it is low in fat and calories, but also because it is high in protein and vitamins. Posole + buffalo = muy bien!


Buffalo Posole
Serves 4

Ingredients

Olive oil
1 pound ground buffalo
1 onion, chopped
1 teaspoon garlic, minced
1 can (29 ounces) white or golden hominy (found in the Hispanic food section)
1 can (10 ounces) diced tomatoes and chilies (Rotel is great, and you can choose how spicy you want it)
3 cups chicken or beef stock
½ teaspoon dried oregano
½ teaspoon ground cumin
Splash fresh lime juice
Handful chopped cilantro

Method

Sauté ground buffalo and onion in some olive oil until cooked through. Add garlic and continue to sauté for another minute. Add the remaining ingredients and simmer for an hour. Skim off any grease that floats to the top while cooking. Serve with tortilla chips, jalapeños, avocado, or cilantro and enjoy!

10.27.2011

Gorgonzola Taralli


Aw, Wednesday. Wednesday was a magical, snowy day. It was the kind of day where you want to just sit in a hot bath, watch snow fall outside the window, and listen to Kenny G… er, I mean, Radiohead. I took advantage of this snow day by embarking on an ambitious baking mission. After talking about Italy at a dinner party with some friends, I couldn’t get a certain food out of my mind – taralli. Taralli is an oval-shaped, southern Italian snack food. Similar to a cracker, this treat is commonly enjoyed with, and even dunked in, a glass of wine. Thomas and I must have snacked on millions of them while in Naples, and we consequently enjoyed just as many wines. Taralli and wine are like Italy’s version of cookies and milk. They just go together!

I wanted to spice up my taralli by adding gorgonzola cheese, so I strapped on my snow boots and trekked over to the neighborhood cheese shop, which thankfully was open on such a snowy day. When I got home with the gorgonzola, I realized that I didn’t have enough flour, so on went the snow boots again, and off I went to a neighbor’s house. Now, equipped with all of my ingredients, I started my arduous journey of making taralli. This is the perfect food to bake if you are snowed in and have a few hours to spare. This recipe makes a massive amount of taralli, so be sure to either have enough wine on hand (for dunking purposes) or share them with your other snowed-in neighbors. Can you guess which option I chose?


Gorgonzola Taralli
Makes about 110 tarallis. Note: I used whole-wheat flour to make them a bit healthier. If you would like a more traditional batch of taralli, just use regular all-purpose flour (4 cups total).

Ingredients

2 cups all-purpose flour
2 cups whole-wheat flour
1 tablespoon salt
1 ¼ cups dry white wine
1 ¼ cups extra virgin olive oil
½ tablespoon sugar
1 teaspoon crushed red pepper
4 ounces Gorgonzola cheese, crumbled


Method

Combine all ingredients in a large bowl and form a ball of dough. Flour your work surface. Take small amounts of dough and roll into long ropes, about the width of a pencil. Cut into smaller ropes about 6 inches long and shape them into rings, pinching them at the ends. Continue to form rings with the remainder of the dough.

On the stove top, bring a large pot of water to a boil. Drop in the rings, about 7 or 8 at a time. After the rings begin to float, remove them with a slotted spoon and set them aside. Let them drain and dry as you preheat the oven to 350 degrees.

Spray a baking sheet with cooking spray and arrange the rings in a single layer. They can be close together since they will not rise or expand. Bake for 20 minutes, flip them, and then continue to bake for another 20 minutes until golden brown. Transfer to a cooling rack. Pour some delicious wine and enjoy!

Don’t they look like little fish? Look at this guy. He can’t wait to jump into the vino!

Yes, my little fishies, go toward the wine! That's it. Yes, just like in Italia!

10.24.2011

Baked Brie with Pomegranate & Honey


Over the weekend, Thomas and I enjoyed some wine with our awesome new neighbors. I whipped up prosciutto-wrapped dates, spiced almonds, and baked Brie with pomegranate and honey for the occasion. The Brie dish was a twist on an appetizer that we once had at Les Halles in NYC, where they serve warm Brie topped with honey and coarse black pepper. It’s almost shocking how good this appetizer is due to its extraordinary simplicity. For my version, I subbed black pepper for a lonely pomegranate that has been staring at me for weeks from our fruit bowl – it was like the last kid picked for dodgeball. Pomegranate arils not only added some major flavor to the dish, but some vibrant color as well. The baked Brie was the perfect treat on a crisp Autumn evening as we got to know our neighbors a bit better. As we sipped wine and exchanged stories, I couldn’t help but envision the menu for the next neighborly get-together. Maybe we’ll form a dodgeball team....


Baked Brie with Pomegranate & Honey

Ingredients

Wedge or wheel of Brie
Honey
Pomegranate

Method

Preheat oven to 350 degrees. Remove the arils from the pomegranate. Click here for a tutorial. Spray a baking sheet with cooking spray. Place the Brie on the baking sheet and heat in the oven for about 5 minutes so that the cheese is warm, but not melted. Transfer the cheese to a plate, drizzle with honey, and sprinkle with pomegranate arils. Serve with bread or crackers and enjoy!

10.20.2011

Charred Cauliflower with Tahini Sauce


Thomas and I recently moved into a new house and we have spent far too much time in Home Depots. Yes, plural. We’ve gone to pretty much every Home Depot location in the state of Colorado. Each time we would walk out of a store, the scent of hot dogs from the strategically placed hot dog stand would slap us in the face. When Thomas asked me what we should do for dinner one night, I answered like a robot, “Hot dogs.” My answer shocked and elated my hubby. He looked like a kid on Christmas morning. Typically, for us, hot dogs are only eaten while inside Yankee Stadium, so this was clearly groundbreaking. I drew the line at eating a hot dog from Home Depot, though, so we went to a place called Biker Jim’s, which serves up gourmet dogs made of rattlesnake, elk, reindeer, and wild boar. This place was perfect – it not only fulfilled our hot dog fix, but it also glammed things up a bit after spending hours and hours at Home Depot. Yeah, I just classified a hot dog joint as glam.


One of the side dishes that we enjoyed at Biker Jim’s was charred tahini cauliflower. They put cauliflower florets in a wire basket, quickly charred them right over the grill, and then tossed them with a tahini sauce. Tahini, which is a paste made from ground sesame seeds, is most commonly known as an ingredient found in hummus. Its creamy and nutty taste complemented the charred cauliflower so perfectly that I decided to recreate the dish at home. I’m not quite sure if I got the exact recipe right, but I came pretty darn close! In fact, this charred cauliflower is so tasty that you won’t even miss the glammed-up gourmet hot dog. Thanks, Biker Jim!


Charred Cauliflower with Tahini Sauce
Serves 2

Ingredients

1 head cauliflower, cut into florets
Olive oil
2 tablespoons tahini
1 tablespoon water
1 teaspoon lemon juice
1 teaspoon soy sauce
1 teaspoon maple syrup
Drizzle of sesame oil (optional)
Chopped parsley


Method

Preheat oven to 450 degrees. Toss cauliflower florets in olive oil and spread out on a baking sheet. Season with salt and pepper. Roast in oven for 20 minutes, turning halfway though. Meanwhile, combine tahini, water, lemon juice, soy sauce, maple syrup, and sesame oil in a bowl. Stir until combined. When the cauliflower is golden brown and slightly charred, cover in tahini sauce and toss. Top with chopped parsley and enjoy!

10.17.2011

Seared Scallops & Deconstructed Brussels Sprouts


I don’t have a very good track record with scallops. After one grossed-out husband and two failed cooking attempts, I eventually learned three very important scallop preparation rules:

1) Rinse the scallops to remove sand. No one likes to eat sand.

2) Dry them thoroughly with paper towels before cooking. When scallops cook, they release water. If you skip this step, then they will just end up swimming in liquid in your pan. They swam enough in the ocean (or whatever it is that scallops do), so they don’t need any more exercise.

3) Sear them on medium high heat and don’t crowd them. When searing, the goal is to brown the scallops while thoroughly cooking them. Burnt outsides and raw insides are not a winning combination. Also, no matter how much you want to cram all the scallops in a pan, fight the urge to crowd them. They can’t brown properly if you don’t give the little guys enough breathing room.


On the other hand, brussels sprouts and I have an excellent track record! I love experimenting with various cooking methods and different accompaniments, like pancetta, walnuts, and caramelized onions. Similar to scallops, my goal for cooking brussels sprouts is to fully brown them. I absolutely love the caramelized leaves that unravel as they roast. This time, I deconstructed the sprouts so that all of the separated leaves were given a chance to brown. This recipe is super easy to make and the main lesson that you will learn is that tiny little bugs love living in between the brussels sprouts’ leaves. Deconstructing them isn’t such a bad idea after all.


Seared Scallops & Deconstructed Brussels Sprouts
Serves 2

Ingredients

Olive oil
6 sea scallops, rinsed and dried
1 pound brussels sprouts
Handful slivered almonds or pine nuts
Handful golden raisins
Splash balsamic vinegar
Salt and pepper

Method

Cut the stems off the brussels sprouts and tear away all of the leaves. In a pan over medium high heat, sauté the leaves in some olive oil. Add the slivered almonds or pine nuts, golden raisins, and a splash of balsamic vinegar and season with salt and pepper. Cook until the nuts have toasted and the leaves have caramelized. Set aside on a plate.

Return the pan to the heat and add more olive oil. After the scallops have been rinsed and patted dry, season them with salt and pepper. Sear them for about 2 minutes per side. Don’t crowd them! Serve the scallops over the deconstructed brussels sprouts and enjoy!

10.13.2011

Popovers with Maple Butter

When I was growing up, my family celebrated special occasions at a cozy little hideaway called Normandie Farm Restaurant. It’s a super old-school place that serves up dishes like Clams Casino and Beef Wellington, and I am fairly certain that they haven’t altered the menu much over the past 80 years. Perhaps the main reason that my family frequented Normandie Farm was their trademark popovers that arrived at the table piping hot from the oven. For me, popovers are synonymous with the restaurant. Celebrating my Confirmation, graduation, or birthday meant popping open one too many golden popovers. I loved tearing the crispy crust, watching the steam escape, and then slathering their airy, eggy centers with pads of cold butter. I’d watch the butter quickly melt into puddles and then I’d devour them immediately. I’m sure I looked like quite the little popover monster disguised in my Sunday’s best.

With the weather starting to get chilly, I felt the need to whip up my own batch of popovers. Typically, they are served around the holidays with roasts, but I wanted to keep things simple by just topping them with some homemade maple butter. The recipe calls for basic ingredients and the end result is warm, comforting, and delicious. The best part is that it doesn’t have to be a special occasion to feast on these puffy little treats and you can be as much of a monster as you please.

Maple Butter

Ingredients

½ cup butter, softened
¼ cup pure maple syrup

Method

Using an electric mixer, beat until butter and syrup are combined. Add a pinch of salt if using unsalted butter. Slather on warm popovers and enjoy!

Popovers
Makes 6-8 popovers

Ingredients

2 eggs
1 cup All-purpose flour
1 cup milk
½ teaspoon salt
Butter or cooking spray

Method

Preheat oven to 450 degrees. Grease muffin or popover pan. Place the pan in the oven for about 3 minutes, until hot.

In a bowl, beat eggs, flour, milk, and salt until just smooth. Do not to overbeat. Fill cups ¾ of the way full. The pan should be hot when doing this. Bake for 20 minutes. Decrease oven temperature to 350 degrees and bake for 15 minutes more. During the entire baking time, do not open the oven because this will prevent popovers from, well, popping over. Serve warm from the oven and top with maple butter.

10.09.2011

Beer Batter Spätzle

Well, it’s October. I sincerely and genuinely hope that you have participated in at least one Oktoberfest celebration. If you haven’t, then I'm sorry – you’ve totally missed out on Germany's finest imports like brats, beers, and pretzels (not to mention the Chicken Dance). Here’s your chance to make up for it, though, and whip up a batch of spätzle! Spätzle is Germany’s answer to pasta, but without all of the kneading and rolling. It is sort of like a cross between egg noodles and small dumplings. Typically, the dough is made with eggs, flour, and milk. For this version, I have decided to substitute beer for milk. What’s more German than that, ja? Sauté this spätzle with browned butter and caramelized onions and have a good ole Oktoberfest celebration of your own. Throw in a few Chicken Dance moves in between bites and you’re good to go.

Beer Batter Spätzle
Serves 4

Ingredients

2 eggs
¼-½ cup beer
1 cup All-purpose flour
½ teaspoon salt
Pinch nutmeg


Method

In a bowl, beat the eggs and then stir in the beer, flour, salt, and nutmeg. Mix until batter is smooth and has reached similar consistency to thick pancake batter. Either use a spätzle maker or a colander to push the batter through the holes into boiling water. If using a colander, just spoon batter into the bottom and then smear it through the holes with a spatula or bowl scraper. Do it in a few batches. When the spätzle floats to the top (usually after about 3 minutes), use a slotted spoon to remove it from the water and then drain. Sauté cooked spätzle with caramelized onions and browned butter and enjoy!

10.06.2011

Anniversary Dinner at Jean Georges

Thomas and I recently celebrated our anniversary in New York City, where we first met. We love to revisit our old stomping grounds, hang out with friends, catch a Yankees game, and eat at fancy pants restaurants while we are there. We’ve dined at Gramercy Tavern and Marea on previous anniversary trips (here is a pic of us with Chef Michael White), but this time, we reserved a table at the world-renowned Jean Georges. I usually hate when people say that they ate the best meal of their lives because a) I feel like they don’t get out much, and b) I usually think they are just being dramatic attention hogs. I have to say, though, that our meal at Jean Georges was the BEST meal we have ever eaten! Ever!

For the sake of this blog, I took one for the team and photographed every delicious course that we enjoyed at Jean Georges. Like I said, this is a fancy pants restaurant, so I looked like a total goober as I chronicled each course of our gastronomic journey. This really didn’t faze me though because our audible oohing and awing alone made us look enough like goobers. The pictures from our epic meal are below. I apologize if they look dark and grainy. As you can probably guess, I couldn’t waste any time perfecting my photography skills when these plates of perfection were sitting in front of me. So, enjoy…I know we did! And yes, we do get out quite often. And no, I’m not being dramatic.


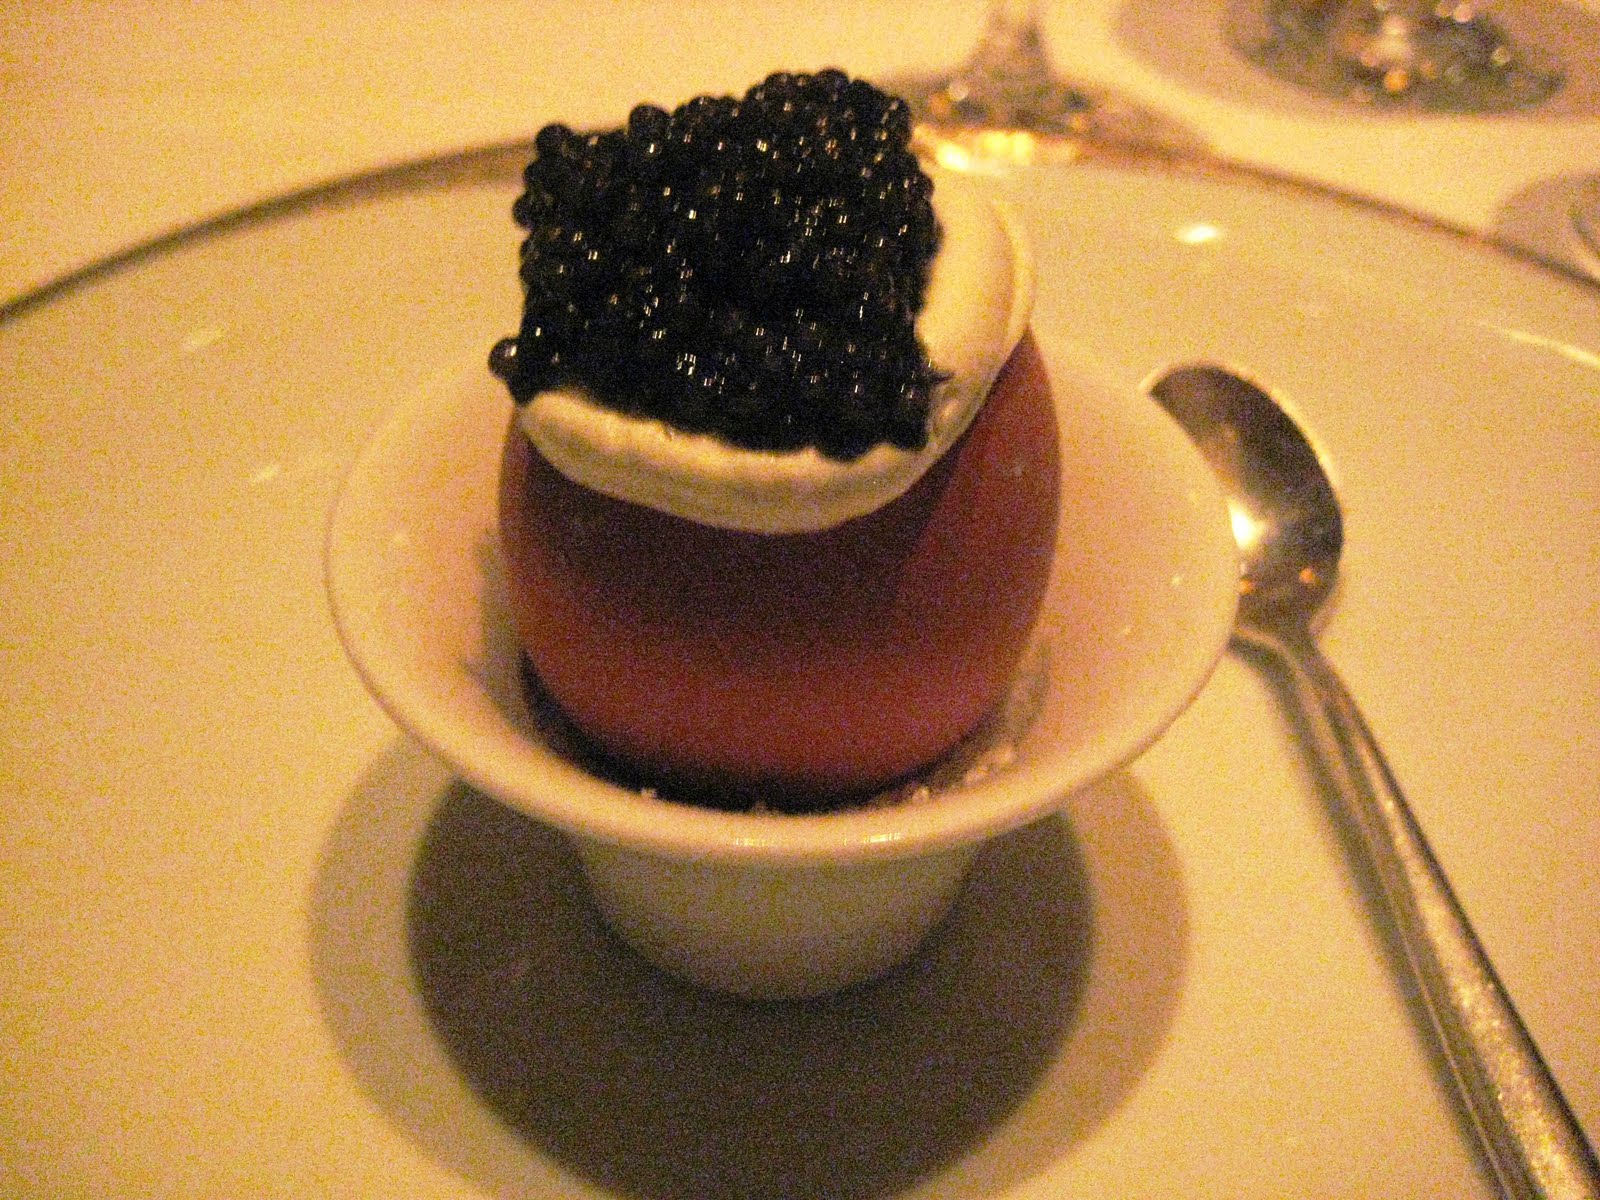
We reserved a specific, more private table for our dinner, so there was a bit of a wait once we arrived at the restaurant. We honestly did not mind at all, but as a consolation, we were graciously supplied with champagne as we waited (see above photo). We were also given complimentary dishes once we were finally seated. Now slightly tipsy from our bubbly, we started on Jean Georges' signature egg caviar with soft scrambled eggs, cream, and sturgeon caviar. It was a lovely presentation that successfully made scrambled eggs not only look elegant, but also fun to eat.

We also had egg toast with dill and caviar. This dish shared similar flavors as the egg caviar, but differed in texture. Thick egg yolk was sandwiched in between toasted brioche and then topped with a good amount of sturgeon caviar. Both were incredibly innovative and delicious - the perfect way to begin our meal.

This was our amuse bouche of poached shrimp, yellow pepper gazpacho, and a jalapeño-corn fritter. I found this to be very generous by amuse bouche standards and, of course, I wanted more.

Next up was my favorite part of our meal - Foie gras brûlée with slow-roasted strawberries and 20-year-old balsamic vinegar. I love foie gras on its own, but what made this course extraordinary was the crisp and sweet brûléed topping, which was absolute perfection with the strawberries and balsamic. This would without a doubt be my last meal request on death row.

Thomas had sea scallops with caramelized cauliflower in a caper-raisin emulsion. The scallops were perfectly seared while the sauce had a deliciously balanced sweet-to-salty ratio.


For the next course, I had charred corn ravioli with cherry tomato salad and basil fondue. This plate couldn't be any fresher with ripened tomatoes and sweet corn. The basil fondue was a great complement to the soft pillows of handmade raviolis.

Thomas had slowly-cooked Arctic char with basil, heirloom tomatoes, and olive oil. Again, this dish was incredibly fresh. Honestly, this course could have just had tomatoes drizzled in olive oil and it still would have been fantastic - the tomatoes and olive oil were that good! I have to find out where the olive oil came from...


For our third course, we both unintentionally enjoyed the beef tenderloin with Comté beignets and pear-horseradish sauce. Thomas originally ordered the lamb chops, but our server took them back because they were freakishly fatty. (That must have been one lazy lamb!) Once he tasted my beef tenderloin, he ordered it as well. As you can see from the photos, the server sliced the tenderloin for me. What service! Even though the meat was expertly seasoned and cooked, we both agreed that the star of this dish was the pear-horseradish sauce. I will definitely try to remake this at home, so stay tuned!


Desserts at Jean Georges are served by theme as quartets. I ordered the chocolate dessert, while Thomas had the strawberry. These quartets were such fun to eat - just when we thought that our next bite couldn't get any better, it did! All components of my chocolate dessert were stellar, but the star was definitely the spiced ice cream. I still can't quite put my finger on the exact flavors, but I tasted hints of cinnamon, cayenne, coffee, and sea salt.

Thomas' strawberry quartet was just as impressive. His favorite part was the strawberry sangria sorbet. It was a deliciously bipolar sorbet - frozen, yet melted and tart, yet sweet. We were also given petit fours of mini macarons, gourmet marshmallows, and chocolates. We devoured them as soon as we saw them, so suffice it to say, there is no photo. And if the petit fours weren't enough, we were also served an adorable complimentary anniversary cake!

Our meal at Jean Georges was unforgettable to say the least. The service was top notch and the food kept us guessing. Each course was exciting, titilating, and appealing to all of our senses. I can only hope that we will one day return for another dinner at Jean Georges - perhaps for our next anniversary? Done and done!

10.02.2011

Curried Pumpkin Soup & Kale Chips

Each time Thomas and I go on a trip and eat ourselves senseless, we try to counteract our gluttony with a few detox meals once we return home. It’s become a bit of a routine – devour everything in sight while on vacation and then eat tons and tons of vegetables when we get back. While we were recently in New York, we had brunch at the incredible Park Avenue Autumn. Over a scrumptious basket of assorted pastries, Thomas and I paused, looked at each other, and simultaneously said, “Detox this week,” and then we continued to gorge ourselves on lovely pumpkin bread and pistachio scones.

Typically, our detox meals consist of vegetable soups that are loaded with all types of leafy greens, legumes, and name-any-healthy-vegetable-here. I change it up from time to time, like with curried pumpkin soup. This soup is so simple to make and it is tremendously healthy due to the vitamins and fiber found in the pumpkin, as well as the many health benefits of curry powder’s turmeric. Usually I add kale to our vegetable detox soups, but this time I decided to serve it on the side as kale chips. Do I even need to explain the health nut factor of kale? I didn’t think so. Curried pumpkin soup is a light and healthy meal that definitely eased us back into our healthy lifestyles and got us right back on track – well, until our next trip.

Kale Chips

Ingredients

1 bunch of kale
Salt
Curry powder (if desired)
Cooking spray

Method

Preheat oven to 300 degrees and spray a baking sheet with cooking spray. Wash kale and pat dry. Remove leaves and then tear into pieces. Avoid the stem because it is really tough. Place the leaves in an even layer on the baking sheet. Spray the tops of the leaves with more cooking spray and then season with salt and curry powder (if using). Bake for 6-7 minutes, flip leaves, and then bake for 5 more minutes until crisp.


Curried Pumpkin Soup
Recipe is vegan, gluten-free, low calorie, and tasty!

Ingredients
Makes 2 detoxifying cups or 1 large bowl

1 can pure pumpkin (15 ounces)
½ cup lite coconut milk
½ teaspoon curry powder
1/8 teaspoon cumin
1/8 teaspoon cayenne pepper
1/8 teaspoon ground ginger
¼ teaspoon cinnamon
1/8 teaspoon garlic powder
¼ teaspoon salt
1 bay leaf
Sliver of onion

Method

Combine all ingredients in a pot over medium heat. Stir together until combined. Instead of chopping the onion, I like to just simmer a piece in the soup. It adds flavor to the soup while not making it chunky – it’s a texture thing. Add more coconut milk to the soup if you’d like the consistency thinner. Stir constantly for about 5-10 minutes until the soup is heated through. Remove the onion sliver and the bay leaf. Season with more salt and pepper, if needed, and enjoy!