8.25.2011

Salted Maple Caramels

You’ve heard of salted caramels, right? Don’t you just love the sweet and salty combination? Wouldn’t you like to try salted maple caramels? Do you want your home to smell like a maple syrup factory, making you feel like you’re just a little elf at work? Are you craving something so buttery and rich with flavors of caramel, maple, and a hint of sea salt? Do you want to be the star among your friends when you show up at a dinner party with cute little caramel bundles of goodness? Have you ever wished that your culinary triumph would prompt an incredibly satisfied friend to high five you like in an 80’s movie freeze frame ending?

If you answered “no” to any of these questions, then I’m afraid we can’t be friends. Our journey ends here. No salty sweet goodness. No 80’s high five. You're really missing out. But it's better this way – just means more salted maple caramels for me! You probably wouldn't want to high five me anyway. My hands are still sticky from eating all of these tasty salted maple caramels...our hands would have stuck together.


Salted Maple Caramels


Sorry, but I've removed this recipe temporarily. 

In the meantime, you can visit my online store and purchase all types of delicious caramels!

Go ahead, you know you want some - Hippie Chick Candy Company. 

Email me if you have any questions! 

Chrissy (at) hippiechickcandy (dot) com 


Greek Shrimp, Tomato, and Halloumi Skewers


After much anticipation and excitement, I had my very first acupuncture session last week. One of my best friends has been singing the alternative medicine’s praises for years now, so I decided to give it a try. Yes, acupuncture is relaxing, and yes, it relieves countless health conditions, but can someone please explain why I couldn’t stop thinking about kebabs and skewers?

With each prick of the tiny pins, I imagined alternating pieces of vegetables and chicken on a skewer. It almost became a game of acupuncture Twister – right foot, chicken. Left hand, tomato. When my acupuncturist shot electrical waves through the pins, I couldn’t help but imagine grilling my perfectly-threaded imaginary kebabs. Needless to say, I left my appointment feeling like a kebab-craving pin cushion.

When I got home, I made a great Greek feast of shrimp, tomato, and halloumi skewers. Halloumi is a tangy and salty cheese that can be easily grilled or fried, making it the perfect addition to my skewers. After my day of getting electrified and prodded with pins, it was definitely fun to be the one doing the skewering and grilling.


Greek Shrimp, Tomato, and Halloumi Skewers

Serves 2

Ingredients

8 shrimp, peeled and deveined
8 cherry tomatoes
8 one-inch pieces of halloumi cheese
Olive oil
Salt and pepper
Fresh lemon juice
Oregano

Method

Preheat grill. If using wooden sticks as skewers, soak them in water for about 30 minutes. Thread shrimp, tomatoes, and halloumi pieces on skewers. Brush with olive oil and season with salt and pepper (keep in mind that the cheese can be very salty). Place on the grill and cook for about 2-3 minutes per side. When done, squeeze some fresh lemon juice over the skewers and season with oregano and enjoy!

8.21.2011

Cocoa-Spiced Almonds


Things I learned this past week:

Acupuncture is scary but awesome.

If you can’t find a cigar cutter, a steak knife is not a good substitute.

My husband’s first kiss was during Basic Instinct. Mine was during Jumanji. What’s wrong with this picture?

A newly opened beer garden in my neighborhood has me questioning whether I ever want to move.

I still don’t fully understand how Twitter works.

Now that football has started up again, our mornings will be spent watching ESPN instead of CNN.

Emails with Jean Claude Van Damme dancing and text pics of my bff’s baby make me happy all day long.

Apparently I’m weird because I put odd spices in odd foods.

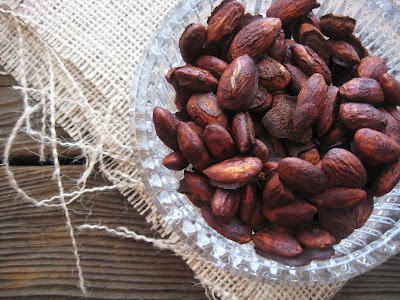
On that note, I love playing with spices and I sometimes use them in odd ways. I throw ginger in my coffee or tea, I incorporate cayenne pepper and turmeric into my oatmeal, and I always add cinnamon to anything in the chocolate food group. It is a food group, you know? I’ve even begun to take spice supplements to do everything from regulating my blood sugar to increasing my metabolism. Maybe that’s odd too? I don’t know. Anyway, I’ve found that the combination of cocoa, cinnamon, ginger, and cayenne can be a dangerously tasty one. With rich, spicy, and robust notes, these spices work incredibly well together and chances are high that they are already in your cabinet. My Cocoa-Spiced Almonds are super easy to make and pair amazingly well with full-bodied red wine or tangy blue cheese. Whether you enjoy these almonds with a cheese platter, trail mix, or simply on their own, there won’t be anything odd about it. Now, it’s time to go watch Jean Claude Van Damme dance…again.


Cocoa-Spiced Almonds

Ingredients

1 cup almonds
1 egg white
2 tablespoons cocoa powder
1 teaspoon cinnamon
½ teaspoon cayenne pepper
¼ teaspoon ginger
½ teaspoon vanilla extract
3 tablespoons sugar or honey
½ teaspoon salt
Cooking spray

Method

Preheat oven to 300 degrees. In a large bowl, beat the egg white until frothy. Add the cocoa powder, spices, vanilla, sugar, and salt and stir until they are incorporated. Add the almonds and stir to evenly coat them.

Spray a baking sheet with cooking spray. Spread almonds on the baking sheet in an even layer. Bake for 30-35 minutes. Shake the baking sheet once or twice to rotate the nuts. Allow them to cool and then enjoy!


8.12.2011

Chocolate Babka French Toast with a Port Wine Reduction

“No. No way. Oh… my… Is she gonna do it? No, I can’t watch. What? I can’t believe it. She’s doing it. She did it. She deep fried it. Whoa!”

That’s me watching Paula Deen’s ridiculous cooking show. That woman is crazy! Just when you think that she can’t possibly use any more butter, she throws in enough to kill a miniature horse. And when you wonder if there is possibly any other way for her to make a dish even more unhealthy and artery-clogging, she turns to her trusty deep fryer. I questioned sweet ole Paula’s sanity when she concocted a recipe for deep-fried butter balls. Yes, you read that correctly. She formed butter and cream cheese into balls and then fried them. Forget shivers down my spine, this recipe sends my heart into irregular palpitations! Is she trying to kill us? Is she pure evil, masked by an adorable southern belle facade? Who knows.

Although I probably will never actually cook any of Paula’s recipes, I am still willing to watch her show for pure entertainment value. Anyway, who am I to judge? Especially after I came up with the idea to make Chocolate Babka French Toast. This dish seems like it was taken right out of a page of Paula’s cookbook. Not only did I veer away from my usual organic sprouted whole grain bread to use chocolate babka, but I also turned my back on my pure maple syrup and went for a port wine reduction. Cinnamon babka can be used as well, and contrary to what Elaine on Seinfeld may think, it definitely is not a “lesser babka.” One thing is for sure – I certainly won’t be scoring any health points with this recipe. I guess I will just follow Paula’s example and spend the remainder of the day saying cute and forgivable things like “Y’all” and “Bless your heart” to make up for my gluttonous agenda pushing.

Chocolate Babka French Toast with a Port Wine Reduction

Serves 2

Ingredients

1 chocolate babka (I bought mine at Whole Foods)
2 eggs
Splash milk
Dash salt
1 tablespoon butter
2 cups Port wine (tawny or ruby port can both be used)
Powdered sugar

Method

In a medium pot, bring port to a boil and then simmer for 20-25 minutes. The port will reduce significantly until it reaches a syrupy consistency. Set aside to cool.

Cut babka into four 1 inch slices. In a shallow and flat bowl, whisk together eggs, splash of milk, and a dash of salt. Carefully coat babka slices in egg mixture, rotating until all sides are saturated.

In a nonstick pan, heat butter over medium heat. Fry babka slices in butter until golden brown on both sides (about 2 minutes per side). Dust with powdered sugar through a sifter and drizzle with port wine reduction. Serve with berries and whipped cream and enjoy!


8.10.2011

Roasted Corn and Cojita Quesadillas


Remember what a pain braces were when you were a teenager? And remember how they sucked even that much more during the summer months when fresh corn on the cob was in season? That specific food was the bane of my existence during those challenging teeth-straightening years. I can recall a truly epic fail when I once dared to devour corn on the cob, only to see my mom abashedly point to her teeth, signaling that I had bits and pieces lodged in between the neon rubber bands of my braces. She then went into the kitchen to fetch a medieval looking device that removed the corn from the cob in one swift motion. Even though I was really impressed with the tool, I still felt a little ashamed, like I wasn’t quite as cool as my older brother and sister who weren’t exactly cob-challenged like I was.

From previous posts like this and this, it is easy to see that I am not only totally obsessed with corn, but I also prefer to eat it off of the sometimes daunting cob – maybe that’s just the awkward teenager in me. When I recently came across this recipe for Mexican grilled corn (or Elote Loco), all of my painful braces memories came rushing back. Just the thought of biting into a messy, cheese-covered piece of corn on the cob made my teeth and gums ache. After modifying the classic recipe for Elote Loco, my Roasted Corn and Cojita Quesadillas are not only easier to make, but also easier to eat! The best part is that they won’t have you incidentally reaching for the floss and toothpicks afterwards. My mother would be so proud.


Roasted Corn and Cojita Quesadillas

Serves 2

Ingredients

2 ears of corn or 2 cups frozen corn
Butter for sautéing the corn and frying the tortillas
Cayenne pepper or chili powder
Fresh lime juice
Cilantro, chopped
2 large tortillas
½ cup Queso Fresco, grated
½ cup Cojita cheese, grated


Method

Cut the corn from the cob using a sharp knife. This will be messy, so be ready for corn to fly in every direction. Sauté the corn with some butter in a pan over medium high heat until it has roasted a bit. Add a pinch of cayenne pepper or chili powder, splash of fresh lime juice, and some chopped cilantro. Stir and then pour into a bowl and set aside.

Melt some more butter in the same pan. Fill half of a tortilla with grated cheese and corn and then fold it over. Fry in the pan until golden brown on both sides. Repeat with the other tortilla, remainder of the cheese, and corn. Garnish with cilantro, salsa, and sour cream and enjoy!


8.04.2011

Madagascan Vanilla Bean Honey

Ever since starting this blog a few months ago, I have taken to occasionally checking the stats and traffic. Okay, I lied. I’m completely addicted to monitoring all features of My Fare Foodie – from the referring URLs, to the random Google searches, to the page views by country. I find comfort in knowing that when I see Japan on the list of countries, that at least one of those readers is my friend Kat in Tokyo. Konnichiwa, Kat!

Probably the most interesting statistic to follow is the list of Google word searches that lead people to my blog. Beside the often hilarious misspellings, what I find fascinating is the most frequent search, which happens to be for lavender simple syrup. Every single day I am amazed to see the amount of times that people Google its recipe and then stumble upon my blog. The funniest thing is that I wrote that post in a last minute, half-hearted hurry before I left for vacation and never thought much of it. Go figure.


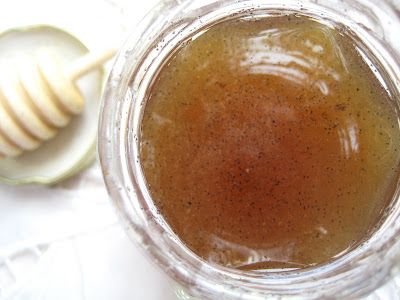
Since it appears that the Googlers of the world are incredibly curious about infused sweeteners, I’m adding one more to the mix with Madagascan Vanilla Bean Honey. The following recipe is extremely easy to follow and the resulting infused honey tastes great with herbal tea, toast, oatmeal, fruit, and Greek yogurt. I hope that this Madagascan Vanilla Bean Honey attracts just as much attention as lavender simple syrup has, and that potential readers across the globe continue to “bee” curious with their random Google searches.


Madagascan Vanilla Bean Honey

Ingredients

3 Madagascan vanilla beans, found at specialty food stores or here
8 ounces honey
4 ounces water


Method

Split the vanilla beans in half. Using the back of a knife to slide down each half, remove the seeds from the pods.

In a small pot, whisk together the honey, water, and vanilla beans. Bring to boil and then simmer for 15-20 minutes. I added water not only because it prevents the natural sugars in the honey from burning, but also because it aids in stirring and infusing. Through boiling and simmering, the water vaporizes anyway.

Pour into a jar and cool for about 6 hours or overnight until it reaches the viscosity of honey. Don’t worry if the mixture appears very thin at first – it will thicken up after it has completely cooled. The vanilla beans will mostly float up to the top of the surface as it cools, so you can either scoop most of them out or stir them back into the mixture. I think that the honey looks more appealing and interesting with the vanilla beans floating in it, but it is a matter of personal preference. Enjoy!

8.02.2011

Gnocchi with Red Grapes and Gorgonzola


After an amazing vacation with some good friends through California Wine Country, I have to say that the highlight of the trip occurred at the tasting table at Far Niente Winery. Despite the breathtaking and jaw-dropping views, expertly manicured estate grounds, and exquisite rare car collection, the winery’s pairing of their renowned Dolce wine with Empereur Bleu d' Auvergne cheese truly stole the show. This dessert wine was basically liquid gold – fruity and sweet like honey, but not syrupy, and crisp and acidic, but still buttery. It paired unbelievably well with the cheese’s salty, strong bite and creamy texture. I was so thankful that Thomas doesn’t eat blue cheese because I gobbled his portion right up. Unfortunately, before I could get around to it, he had already downed his Dolce and shot me a satisfied grin.


(Top table photo from Far Niente website)

After we returned home, I wanted to emulate the flavors of buttery, sweet grapes with pungent blue cheese, so I threw together Gnocchi with Red Grapes and Gorgonzola. It may seem like a strange dish, but trust me, it is delicious (substitute cherry tomatoes for the grapes if you’d like). As we learned at Far Niente Winery, the saying “Il dolce far niente” loosely translates to "the sweetness of doing nothing" – and that is exactly what you will feel like doing after eating this delightfully rich dish.


Gnocchi with Red Grapes and Gorgonzola

Makes 2 servings

Ingredients

2 cups store-bought gnocchi
1-2 tablespoons butter
Handful red seedless grapes, halved
1 tablespoon freshly chopped sage
Gorgonzola cheese for topping


Method

Cook the gnocchi according to the package’s instructions and then set aside. Heat a pan on medium heat and start to melt the butter. Wait for the butter to foam and begin to brown. When the foam has subsided, add the grapes, chopped sage, and gnocchi. Toss together to coat and season with salt and pepper. Top with crumbled Gorgonzola cheese and enjoy!


8.01.2011

Butterscotch Coffee Blondies


Don’t you just love it when airlines add those extra touches that make you feel all warm and fuzzy inside? On Sunday evening, Thomas and I flew on Frontier Airlines and were so excited to find that we not only had access to TV during the flight, but we were also served complimentary warm cookies. I chose to dunk my deliciously chewy cookie in my in-flight coffee and it was absolute perfection. Suddenly, the videogame playing brat behind me who kept kicking my seat, the snoring man beside me who kept twitching, and the grown woman in front of me who was deathly terrified of mild turbulence all seemed to fade away. Even my intrusive security pat-down seemed kind of worth it! Speaking of pats, I had to pat myself on the back after I selfishly accepted the cookie intended for the sleeping man next to me – which I happily devoured without him suspecting a thing!

I made these Butterscotch Coffee Blondies after my enjoyable in-flight experience with my complimentary coffee-dunking cookies. Sometimes I feel like blondies are the ugly stepchild of brownies, and that they don’t get the credit they deserve. And while I can often get a bit tired of chocolate (gasp!), the combination of butterscotch with coffee makes for a sweet, unique, and comforting treat. When making this recipe, you can of course add chocolate chips or nuts or any other ingredients that you desire. Try these blondies with a hot cup of coffee, sit back, relax, and enjoy the ride.


Butterscotch Coffee Blondies

(Adapted from Mark Bittman’s blondie recipe)

Ingredients

1 stick sweet cream butter, melted
1 cup brown sugar
1 teaspoon vanilla extract
1 teaspoon espresso powder or instant espresso
1 egg
Pinch of salt
1 cup all-purpose flour
½ cup butterscotch chips


Method

Preheat oven to 350 degrees. Melt the butter (you can brown the butter over the stove to give the blondies a nutty flavor). Beat together melted butter, brown sugar, vanilla extract, espresso powder, and egg. Add a pinch of salt and then slowly incorporate the flour.

Toss the butterscotch chips in a bit of flour. This prevents the chips from sinking to the bottom while baking. Stir in the chips.

Pour batter into an 8x8 pan and bake for 25 minutes. Insert a toothpick in the middle and if it comes out clean, then the blondies are done. Let them cool before cutting and enjoy!