6.30.2011

Avocado and Goat Cheese Tart


Thomas and I spent this past weekend vacationing in La Jolla, CA. Our trip was filled with lots of sun, seal spotting, beach barbeques, seaside strolls, and tons and tons of avocados. It seemed like an avocado found its way onto every single plate we had. Somewhere after all of the tuna and avocado sushi rolls and crab and avocado omelets, I ultimately overdosed with one bite of a fried avocado egg roll. That’s all it took – one single bite and I threw in the beach towel. By the end of our stay, I felt like one of those lazy and blubbery seals that spend all day listlessly lounging on the rocks in La Jolla Cove. (I have to say that my hair and skin were absolutely glowing, though, from the avocado’s healthy fats!)


Now that we are back home and longing for our blissful beach days, I decided to bring back that laidback California lifestyle through an avocado and goat cheese tart. This tart is incredibly easy to prepare, pretty to look at, and if it happens to make you feel like a roly-poly seal, just be thankful for your resulting glowing skin and shiny hair.


Avocado and Goat Cheese Tart

Ingredients

1 store bought cornmeal pizza crust (regular pie crust would work too)
1 4-ounce log goat cheese, room temperature
¼ - ½ cup cream or milk
3-4 avocados (from California, of course)
Fresh lemon or lime juice
Salt and pepper to taste
Cilantro


Method

Bake the cornmeal crust according to the package instructions. In a mixing bowl, combine room temperature goat cheese with cream or milk and mix to smooth out to a creamy texture. Spread an even layer of goat cheese on the cornmeal crust once it has cooled. Halve the avocados, remove the pits, peel the skin, and slice lengthwise into equal size pieces. Sprinkle with lemon or lime juice to prevent browning. I once read that cooking spray has the same effect as lemon juice, so that can be used as well. This will lack the acidic taste, however. Arrange slices over the tart in a decorative manner. Season with salt and pepper and garnish with cilantro, if desired. Enjoy!


Follow me on Twitter @MyFareFoodie

6.26.2011

Sugar Cane & Ginger Infused Vodka

While staying at my parents’ home for a few days last week, I made sure to take full advantage of their ample supply of great wines, fancy liquors, and exotic ingredients. It’s always fun to concoct drinks with my parents now that I am older and don't have to do it behind their backs, and I love experimenting with different libations (especially when it is on their dime). I’m currently on an infused vodka kick. From black pepper to chocolate to cucumber, I thoroughly enjoy all types of innovative infusions. I decided to create my own version using sugar cane and ginger root. When I held up a piece of sugar cane with a perplexed look in my kitchen, my Caribbean mother coolly explained to me how to prepare it. Apparently, you are supposed to peel the sugar cane using a knife, but after I found this to be nearly impossible, I poked around in my dad’s tool box to fetch a hammer and chisel. I then proceeded to bang the hell out of the sugar cane on an outdoor picnic table. I must have looked like a crazy woman, and it probably didn’t help that I had a huge bottle of vodka and a confused German Shepherd sitting right next to me.

After I successfully split the sugar cane in half, I added it to a carafe of my favorite vodka, Grey Goose, with some pieces of peeled ginger root. I refrigerated my infused booze overnight and was almost tempted to drink it first thing in the morning because I was so excited about it. I waited until an acceptable cocktail hour, though, and I have to say that my sugar cane and ginger infused vodka was fantastic! I cannot wait to pair this subtly sweet and spicy cocktail with stir fry dishes or sushi. After my adventures in infusions, not only was I thankful for my parents’ supply of liquor and exotic ingredients, but also for my dad’s trusty tool selection and a supportive, yet highly confused German Shepherd.

6.16.2011

Ahi Tuna and Watermelon Ceviche


Thomas and I recently met up with some friends to grab dinner and watch the Yankees game at a typical sports bar. After a few beers, we took a look at the menu. I was shocked to see items such as moules frites, lobster mac and cheese, lamb chops, and filet mignon. Wait a second. I thought this was a sports bar! There were gigantic flat screens covering every inch of wall space and a ping pong table in the corner. The décor and atmosphere said sports bar, whereas the menu said upscale restaurant. This place had a serious case of identity crisis.

Despite the juxtaposing menu and the fact that we were in the land-locked state of Colorado, I went against my better judgment and ordered the Ahi tuna and watermelon ceviche. By combining incredibly fresh Ahi tuna with watermelon, jalapeños, honey, avocado, and cilantro, the flavors harmonized for a sweet and spicy finish. I decided to recreate this deliciously refreshing dish in the recipe below. Bottom line, it doesn’t really matter if you have this dish in an upscale restaurant, sports bar, or your own home, because this Ahi tuna and watermelon ceviche is a winner, just like the Yankees that night!


Ahi Tuna and Watermelon Ceviche

Ingredients

Serves 2

½ pound (8 ounces) sushi grade Ahi tuna, diced
1 cup watermelon, diced
½ cup red onion, chopped
½ teaspoon garlic, minced
½ teaspoon ginger, grated
2 tablespoons soy sauce
1 teaspoon honey
2 tablespoons fresh lime juice
1 jalapeño, sliced
1 avocado, chopped
Cilantro

Method

Dice the tuna and watermelon into equally small pieces. In a bowl, whisk together soy sauce, honey, and lime juice. Stir in the chopped red onion, garlic, and ginger. Add the tuna and watermelon and toss to distribute the mixture. Add the avocado and carefully stir, making sure that the pieces stay whole. Garnish with cilantro and sliced jalapeño. Enjoy!


Gwyneth's Roast Chicken


Remember when Gwyneth Paltrow was just an Academy Award-winning actress? Now, to add to all of her silver screen accomplishments, she is a dutiful mother of two, talented singing sensation, rock-hard fitness phenom, devoted wife to my favorite singer, and accredited cookbook author. Based on all of these traits, I should hate the woman, but strangely, I don’t. I am not ashamed to admit that the only Glee episodes I tuned into featured Gwyneth, and I thought she absolutely rocked. It really bothers me when I read all of the negative comments on blogs from the Gwyneth haters. I believe all of that hostile negativity stems directly from other’s insecurities and jealousies.


People just can’t seem to handle the A-lister’s seemingly perfect lifestyle and her willingness to put herself out there. I have tremendous respect for anybody who steps outside of their comfort zone and tries on a new hat, so to speak. Gwyneth’s often ridiculed website, GOOP, is simply another way for her to express her thoughts, share positive advice, and encourage readers to “nourish [their] inner aspect.” She also posts great recipes, such as this one for roast chicken. Now, before I receive any comments regarding my girl crush, realize that I’m simply here following her super easy recipe....and clearly gushing about the wonder that is Gwyneth. Also, love her or hate her, the girl can make a mean roast chicken.


6.14.2011

Spaghetti Cacio e Pepe con Tartufi


Sounds intimidating, right? Spaghetti cacio e pepe is just a fancy way of saying pasta with cheese and pepper. Despite its elaborate name, this traditional Roman dish is incredibly simple and straightforward. It’s basically an effortless Italian mac and cheese with tons of freshly ground pepper tossed in. Capeesh? While cleaning the other day, I came across our Italian travel guide books. I immediately started reminiscing about our trip through Italy a few months ago (you can see some of my pics here). And when I say that I reminisced about our trip, what I really mean is that I reminisced about our meals there.

To prep for our vacation, I taught myself only the most important words in Italian, such as vino, birra, polpo, and tartufi. Anytime I came across the word tartufi, meaning truffles, my mind was automatically made up and there was no need to decipher the menu any further. I saw it as my duty to consume as many truffles as possible while in the land of truffles – it would be silly not to. When in Rome, right? So, when I recently visited my favorite Italian gourmet food shop and discovered that they had just received a shipment of summer truffles from Umbria, I closed my eyes, forked over my credit card, and returned home with one fabulous truffle. I named him Little Blackie (mainly because we just watched True Grit and I loved that damned horse).

I wish I could tell you that I feasted on truffles while wearing an evening gown and dozens of strands of pearls, but in actuality, I enjoyed my lone truffle shaved over spaghetti cacio e pepe while in sweats and my ratty college T-shirt. I liked the idea of adding a luxurious and elusive ingredient to such a simple and rustic dish. Plus, the texture of the truffle plays well with the coarse pepper grounds. Anytime I find myself missing Italy again, I will definitely make spaghetti cacio e pepe – whether or not Little Blackie will be invited on our trip down memory lane will be up to my wallet.


Spaghetti Cacio e Pepe con Tartufi

Ingredients

Spaghetti
Olive oil
Freshly ground pepper
Freshly grated Pecorino Romano
Fresh black truffle

Method

This recipe is barely groundbreaking and I even think it is silly to call it a recipe at all. Just be sure to keep things simple and use the freshest ingredients possible. Cook the pasta in salted water according to the directions. Before draining, reserve a ladle of the cooking water. Toss the drained pasta with some olive oil, cooking water, freshly ground pepper, and grated Pecorino Romano. Top with freshly shaved black truffle and enjoy!


6.09.2011

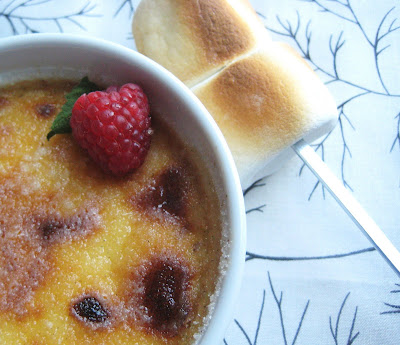
Vanilla Marshmallow Crème Brûlée


Is there anything more retro than marshmallow creme? Maybe a JELL-O mold? Baked Alaska? Tuna-noodle casserole? Or perhaps those paper frills that cover the bones on roasts? Classic! I love that line in the movie Julie & Julia, where French author, Simone Beck, disdainfully questions, “What is Marshmallow Fluff?” as she reads recipes from the pioneering cookbook Joy of Cooking. Although marshmallow creme is exceedingly passé and über unhealthy, it still holds a special place in my heart. For most of my childhood, I feasted on the almighty Fluffernutter, a sandwich combining peanut butter and marshmallow creme. With all of that sugar pumping through my tiny veins, it’s no wonder I still had enough energy to drive my family absolutely nuts after soccer or gymnastics practices.

I’m fully aware that the outdated marshmallow creme and the classically posh crème brûlée are not commonly acquainted. In fact, this culinary combination is the sartorial equivalent of wearing tie dye with a Birkin bag. Nonetheless, my idea to make vanilla marshmallow crème brûlée came to me while roasting marshmallows, where it was my goal to meticulously burn the exterior in order to mimic the crisp top layer of crème brûlée.

My vanilla marshmallow crème brûlée is definitely classier than it is dated. The overly processed jet-puffed marshmallow creme gives way to the silky vanilla custard for a smooth and decadent treat that any Fluffernutter fan would be powerless to resist.


Vanilla Marshmallow Crème Brûlée

Ingredients

Yields 6 servings

1 quart heavy cream
1 vanilla bean, split and scraped
6 egg yolks
½ cup marshmallow creme
Sugar

Method

Preheat oven to 325 degrees. Bring the cream, split vanilla bean, and vanilla seeds just to a boil in a pot over medium heat. Remove from heat and let stand for a few minutes.

In a mixing bowl, combine the egg yolks with marshmallow creme and beat until smooth. Remove the split vanilla bean from the cream. Slowly incorporate the cream into the egg mixture while continually whisking. Pour into 6 (8-ounce) ramekins and place them in a roasting pan. Pour enough hot water into the pan to come halfway up the sides of the ramekins, creating a water bath.

Bake for 45-50 minutes so that the crème brûlées are set but still a bit wobbly in the middle, and then remove them from the water bath. Refrigerate them for a few hours or overnight. Before serving, sprinkle each ramekin with a thin layer of sugar and caramelize using either the oven broiler or kitchen blow torch. If broiling, keep an eye on them and rotate as necessary. You may also need to refrigerate them for a few hours in order to reset the crème brûlées. Serve with fresh fruit, whipped cream, toasted marshmallows, or all of the above and enjoy!


Follow me on Twitter @MyFareFoodie

6.07.2011

Coconut-Ginger Quinoa with Carrots and Shrimp


A few years ago, the first time I made quinoa (pronounced KEEN-wah), it went a little something like this.

Me: I made quinoa for dinner tonight.
Thomas: Keen what??

And that’s the story of how quinoa became a household name.

One of my favorite healthy soups that I enjoy making is carrot ginger soup. Thomas typically only eats coconut if it is in the form of deep-fried coconut shrimp. For this recipe, quinoa serves as a vehicle for delivering ginger, carrots, coconut, and shrimp.

And that’s the story of how Coconut-Ginger Quinoa with Carrots and Shrimp became our dinner.


Coconut-Ginger Quinoa with Carrots and Shrimp

Ingredients

Olive oil
1 cup quinoa
2 cups chicken stock
3 tablespoons unsweetened coconut flakes
1/2 cup grated carrots
1/4 cup chopped onion
1 teaspoon grated fresh ginger
1/2 teaspoon minced garlic
10 peeled and deveined shrimp
Splash fresh lime juice
Cilantro for garnish

Method

Cook quinoa in stock according to package's directions. Meanwhile, toast coconut flakes in a pan, and set aside. Coat the pan in olive oil and sauté carrots and onions until tender. Add the ginger and garlic and cook for just about a minute. Set aside with the toasted coconut flakes. In the same pan, sauté the shrimp until browned.

Once the quinoa is cooked, toss with coconut flakes, carrots, onions, ginger, and garlic. Add minced cilantro and a splash of fresh lime juice. Top with the shrimp and enjoy!


Follow me on Twitter @MyFareFoodie

6.03.2011

Poor Man's Truffle Salt


When my sister came to visit a few weeks ago, I took her to my favorite spice shop which is conveniently located right in my neighborhood. After sampling an array of specialty salts, she forked over a handful of cash for an amazing black truffle salt. Cheap? No. Delicious? Yes! For the rest of her visit, I tried to sneak as much of her pricey truffle salt as possible into my meals (as seen here). I probably owe her about ten dollars for the amount that I generously sprinkled over my morning eggs alone.

Since my sister and her fancy salt have left me, I have been trying to justify spending such a large amount solely on a condiment. Thankfully, as I was considering making my own version, I stumbled upon a recipe for spiced porcini mushroom salt on the Gilt Taste site. I tinkered around with their recipe and decided to keep things simple (and cheap) by using dried shiitake mushrooms and sea salt. This is the poor man’s version of truffle salt. Use it to season meat, fish, eggs, pasta, popcorn, and more. The best part is, the longer it sits, the better it gets! I wonder if my sister would accept a small bottle of my so-called “truffle” salt in exchange for the ten bucks I owe her…


Ingredients

¼ cup dried shiitake mushrooms, ground
¾ cup coarse sea salt
Black truffle oil, if desired

Method

Grind dried mushrooms in a food processor, spice/coffee grinder, or in a mortar and pestle until the mushrooms resemble the size of sea salt granules. Mix in salt. If desired, add a few drops of truffle oil and mix. Keep in an air tight container in a cool dry place. The longer that the salt sits, the more the mushrooms will infuse it.

Notes

Any other dried mushrooms can be used in this recipe. Shiitakes provide a subtle taste, whereas morels or actual truffles offer more pungency. I added a bit of truffle oil to my salt to boost the flavor. Next time, I think that I will try to make genuine truffle salt with summer truffles from Umbria, Italy as soon as they arrive in a few weeks. Cheap? No. Worth it? Yes!


Follow me on Twitter @MyFareFoodie

6.01.2011

Chocolate Stout Covered Pretzels


Over Memorial Day weekend, I went camping for the first time in I can’t even tell you how long. I had my reservations, of course. Are there bears? What do I wear? Should I bring my Ambien? And most importantly, what are we going to eat? Thankfully, my experienced camping companions helped me along the way and kindly eased me into life in the great outdoors. I quickly realized that I didn’t need to worry about our food situation since my friend had a full bag of tricks for making amazing campfire meals, including her ingenious idea to make falafel and all of its traditional toppings.

While sitting around the fire one evening and enjoying my favorite combination ever - beer and pretzels - I snuck off to steal a bite of chocolate intended for late-night S’mores construction. There, huddled under a pine tree, my idea for chocolate stout covered pretzels was born. It’s no secret that I love pretzels, as seen here, so this recipe is a great way to bring together two classic and complimentary ingredients. Now, how do we take these pretzels and incorporate them into the S’mores recipe? I’ll save that for my next camping trip.


Chocolate Stout Covered Pretzels

Ingredients

6 oz. chocolate chips
¼ cup Stout (I used an Imperial Chocolate Stout)
Pretzels

Method

Melt the chocolate chips in the microwave or over a double boiler. Whisk in beer. Dip pretzels in chocolate stout mixture and set to dry on parchment paper. Place in the refrigerator to speed up the setting time.


Enjoy these pretzels on their own or garnish a chocolate stout beer float with them like I did!


Follow me on Twitter @MyFareFoodie (I Tweeted some camping pics!)