7.26.2011

Fish and Chips Eggs Benedict


(Above food pics (2) from Saveur and Little Dish)


Right around this time, Thomas and I were supposed to be gearing up for a trip to Copenhagen with his family. Sadly, we had to cancel the trip due to multiple unforeseen circumstances. Over a pint of Carlsberg, one of Denmark's most delicious beers, I reflectively looked through our photos (seen above) from our vacation to Copenhagen a few summers ago. I love everything about the Danish capital – the colorful waterfront buildings, the bicycle-friendly green lifestyle, the huge amusement park right in the city center, the Barbie and Ken blondes everywhere, and their truly unique cuisine. The locals eat hot dogs and drink chocolate milk like it’s their job. How great is that? Also, the number one-voted restaurant in the world, Noma, calls Copenhagen its home. Truth be told, when I found out that Noma would be closed for summer break at the same time that we would have been in town, I took it as a sign. It just wasn’t meant to be.

Copenhagen is also known for its open-faced sandwiches, or smørrebrød. They are typically served on rye bread and topped with fresh ingredients like smoked fish, eggs, potatoes, asparagus, paté, dill, and caviar. One look at these gourmet sandwiches and you will forever turn your back on Subway – these sandwiches give “eating fresh” a whole new meaning. Using smørrebrød as inspiration, I decided to put together a dish incorporating eggs, potatoes, smoked trout, and dill. My Fish and Chips Eggs Benedict was exactly what I needed to bring me out of my Danish daze. Now, I willingly accept that Copenhagen will always be there, as will Noma – though, here’s hoping it will be open the next time we ever swing through town. Until then, I’ll always have Carlsberg.


Fish and Chips Eggs Benedict

This is a fun twist on the classic eggs benedict recipe, but I've replaced the traditional toasted English muffin with a roasted potato, as well as ham with smoked trout - hence the name Fish and Chips Eggs Benedict.

Serves 2

Ingredients

Olive oil
1 large Russet potato
4 eggs
8 ounces smoked trout filet
Hollandaise sauce (recipe)
Salt and pepper
Dill for garnish


Method

Preheat oven to 325 degrees.

Slice the potato into 4 slices (widthwise in ½ inch slices). Brush with olive oil, season with salt and pepper, and place on a baking sheet. Bake for about 30-35 minutes until golden brown, turning halfway through.

While the potatoes are in the oven, prepare the Hollandaise sauce according to the recipe link above and poach the eggs. I don’t have an egg poacher, so I did it the old fashioned way – here is how I did it.

To assemble, place 2 ounces of smoked trout on each potato. Add a poached egg and then drizzle with Hollandaise sauce. Top with dill, season with salt and pepper, and enjoy!


7.18.2011

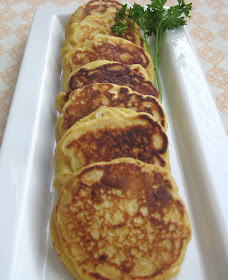
Bourbon-Spiked Corn Cakes


When you marry a southern guy, you’d better learn to love the following: fried foods, BBQ, bourbon, Willie, Waylon, and Johnny. I pretty much had the music part covered, and I thought that I had experienced my fair share of eclectic cuisines until I ventured down south, where I was first introduced to foods like barbecue spaghetti, fried pickles, sausage balls, and every casserole and cobbler under the sun. When we went to Nashville for Thanksgiving last year, our good family friend, David, brought over bourbon corn pudding, another southern food with which I had yet to be acquainted. That corn pudding was straight up addictive – it may as well have been called crack pudding! I can’t even remember if I ate any turkey or stuffing, but I certainly put a major dent in David’s bourbon corn pudding. I'm a little ashamed to admit that I went back for more and had it for breakfast the following morning. It was like crack, I tell you!

Corn and bourbon make for an amazing combination, as I found out after devouring David’s amazing Thanksgiving contribution. Also, one of my all time favorite not-so-healthy-food pairings is caramel corn with a glass of Woodford Reserve (as seen here). By taking cues from both of these tasty dishes, I came up with the idea to make bourbon-spiked corn cakes. The golden browned texture mixed with the natural sweetness of the corn and bourbon make a delicious treat that can be served either savory or sweet. To complement the southern theme, I served my bourbon-spiked corn cakes alongside barbecued pulled pork, but they would also be great with ribs, chicken, or seafood. If you’re feeling adventurous, enjoy these corn cakes with some maple syrup to make one hearty breakfast, although, some may frown upon having bourbon first thing in the morning. Bourbon – it’s what’s for breakfast. Something tells me that Willie, Waylon, and Johnny would definitely be at that breakfast table...along with David and me!


Bourbon-Spiked Corn Cakes

Makes 8 3-inch cakes

Ingredients

½ cup golden corn flour or Masa Harina (found in the international aisle at most grocery stores)
¼ cup all-purpose flour
½ teaspoon baking powder
½ teaspoon salt
1 egg
½ cup milk
½ ounce bourbon
1 ½ teaspoons honey
½ cup fresh or frozen corn
Butter or cooking spray


Method

In a bowl, combine the flours, baking powder, and salt. Whisk together egg, milk, bourbon, and honey in a separate bowl. Pour wet ingredients into dry and stir until well combined. Cut the corn from the cob and mix into the batter. The corn can be blanched or sautéed before adding it to the batter, but I didn’t feel the need.

Similar to making pancakes, heat a pan or griddle on medium heat and then brush with butter or spray with cooking spray. Spoon some batter onto the hot surface, aiming to make cakes about 3 inches in diameter. You can of course make larger cakes if you want. The batter does not bubble as much as regular pancake batter does, so keep an eye out for when the cakes need to be turned (Mine took about 2 minutes to brown). When the edges and underneath appear to be cooked, turn the cakes and continue to cook for another 2 minutes or so.

Again, if you wish to make the cakes sweeter, add more honey. If you want them to be more savory, add more salt. Either way, these bourbon-spiked corn cakes are delicious. Enjoy!


7.15.2011

Rustic Rhuberry Crostata


I feel like I’ve been living on a movie set lately. I’ve witnessed a pattern for days now. Out of absolutely nowhere, clouds roll in, the sky turns black, and rain comes pouring down. I keep waiting for a movie director perched on a crane and equipped with a loud speaker to swing by my window at any given moment. The strong winds force the rain to fall sideways and the thunder is so loud that it shakes the picture frames on the walls. I’ve been tempted to pour some water in a glass, set it on the table, and see if I can get a Jurassic-Park-dinosaur-footstep-water-ripple effect to coincide with the crazy thunder. Then, just like that, it’s all over. The black clouds retreat, giving way to happily chirping birds and spectacular rainbows (Yes, plural. Double rainbow all the way). I guess the director has either yelled “Cut!” or a high maintenance actress was worried about her wet hair and needed a touch-up. Either way, I hope that they don’t need to film any retakes and the big-budget stormy special effects are done for the day.


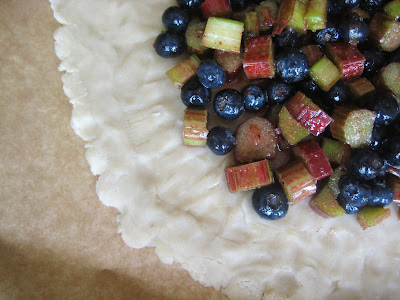
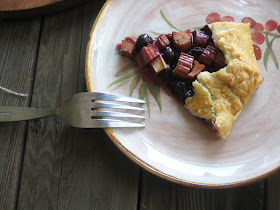
Weather like this makes me want to bake. Since there is something just so comforting about treats fresh out of the oven on rainy days, I made a rustic rhuberry crostata. What’s a rhuberry, you ask? Well, it’s a simple play on words between rhubarb and blueberry. (If you haven’t noticed, I’m big on puns and word play.) This sweet yet tart rhuberry crostata makes weathering the storm a whole lot more fun and potential retakes much more berry-able. See what I did there? It’s a play on words :)


Rustic Rhuberry Crostata

I decided to make a crostata because I love the rustic and free-form look. Plus, I do not own a tart pan, so this was a no-brainer.

Ingredients

1 cup rhubarb, chopped
1 cup blueberries, fresh or frozen
¼ cup sugar
½ teaspoon vanilla extract
¼ teaspoon ground cinnamon
Splash fresh lemon juice
Pinch salt
1 teaspoon corn starch
Pie dough from this recipe (divide it in half!) or frozen store-bought version
1 egg


Method

Make the dough according to the link above. While dough is chilling in the fridge, combine the rhubarb, blueberries, sugar, vanilla extract, cinnamon, lemon juice, salt, and corn starch in a bowl. Allow to sit for 30 minutes to release juices and blend flavors, stirring every so often.

Preheat oven to 375 degrees. Roll out dough onto floured board. Aim to make the dough roughly resemble a circle, about a foot in diameter. It doesn’t have to be perfect – this is supposed to look rustic. Transfer to baking sheet topped with parchment paper. Spoon and spread the rhuberry filling in the center of the dough, leaving a few inches bare towards the edges.


Fold outer edges of the dough over the filling, carefully creasing it section by section. You want the filling to still be visible, but securely contained within the dough. If some filling escapes, who cares, it will look even more rustic.

In a small bowl, beat egg and then brush on the folded-over crust. Sprinkle with sugar. Bake for 30-40 minutes, or until the crust is golden brown. (If using store-bought dough, bake according to package’s instructions.) Allow crostata to sit at room temperature until the filling sets. Once cooled, cut and enjoy!


7.14.2011

Italian Tuna and Farro Salad

Oh, summer. I love summer and all of the traveling that comes with it, but staying at home for the first weekend in what seemed like months was a welcome change. For once, I was perfectly content without setting foot in a single restaurant all weekend long. I was relieved to get back into my kitchen to make meals on my own time and in my own way. It was also nice to settle back into my routine of making fresh and healthy salads after eating way too many behemoth restaurant-sized portions while traveling. For lunch one day, I created a salad by putting a spin on an amazing bruschetta that I recently had on a trip to Rome (I'll shut up about the Italy trip one day, I promise). We went to Angelino ai Fori, a restaurant that was uncharacteristically not touristy despite its location right next to the Colosseum and Roman Forum. In fact, we loved it there so much that we returned two more times to feast al fresco on antipasto, bruschetta, gelato, and Peroni.

Angelino’s tuna, tomato, and rocket (a.k.a. arugula) bruschetta served as inspiration for my Italian Tuna and Farro Salad. The bruschetta's juicy tomatoes, crusty bread, and flavorful tuna were completely drenched in fruity olive oil, and I swear I never knew that something so uncomplicated could be so good. As any Italian grandma will tell you, the ingredients for this salad are key. Be sure to use the freshest ingredients possible while keeping the dish simple. Also, use Italian tuna (or tonno) packed in olive oil – any other tuna just won’t do and an ole stickler grandma would likely shake her fists at Starkist or Bumble Bee. For this recipe, I also used pearled farro, an Italian wheat; however, barley, brown rice, bulgur, or wheat berries would work as well. When you can enjoy this healthy and filling salad and all of its simplicity in the comfort of your own home, who needs the Colosseum…or a colossal-sized restaurant meal for that matter?


Italian Tuna and Farro Salad

Serves 2

½ cup Italian pearled farro (found at health food or specialty stores)
5 ounces premium tuna packed in olive oil (Genova brand is my fav)
Bunch arugula
Handful olives, pitted and halved (I used Gaetas, but Kalamatas work too)
1 tablespoon capers
Handful grape tomatoes, halved
Bunch parsley, chopped
Fresh lemon juice
Olive oil
Salt and pepper

Method

Cook farro according to package instructions and allow to cool. Toss with tuna and its packed olive oil. Mix in arugula, olives, capers, tomatoes, and parsley. Add a squeeze of fresh lemon juice and additional olive oil, if necessary. Season with salt and pepper and enjoy!

7.10.2011

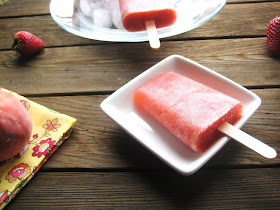
Strawberry Peach Sangria Pops


While Thomas was in Chicago for a few days, I took the time to experiment with some new recipe ideas. Friends find it strange that I like to cook for myself, but I really enjoy testing out new ideas without facing rejection. I’m not saying that Thomas judges my cooking abilities or would ever push his plate aside (he once bravely powered through some disgustingly sandy and rubbery scallops), but my perfectionism definitely rears its ugly face while I’m cooking. After a few recipe test runs, there were some winners including an Italian tuna and farro salad (post coming soon), and there were some losers like roasted chicken with limoncello sauce (mediocre and frankly, a bit nauseating).


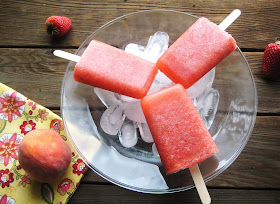
On a lazy Saturday afternoon, I surveyed the contents of my fridge and decided to make use of my ripe strawberries and peaches to create a fun and fruity smoothie. And since the temperature was in the 90’s, I took it one step further and decided to make fun and fruity popsicles. When I discovered a bottle of white zinfandel that a friend gifted us as a joke that had been banished to the deepest corner of the fridge, I just had to take it up a notch and make fun and fruity alcoholic popsicles! Luckily no one was around to criticize me for using such a shoddy wine to make popsicles. Don’t judge me. I played around with my ingredients to make strawberry-peach sangria and then froze the mixture in my $3.99 popsicle molds from Bed, Bath & Beyond. Although the finished product was refreshingly delicious, I failed to take into consideration that when making these strawberry peach sangria pops alone, that I would essentially be drinking alone too. Oh well. Bottoms up! Again, don’t judge me :)


Strawberry Peach Sangria Pops

Makes 4 large popsicles

Ingredients

1 cup strawberries, diced
1 cup peaches, diced (skins and pits removed)
½ cup white grape juice
½ cup white wine (Riesling or Sauvignon Blanc would be nice, or perhaps a Rosé)
Pinch of cinnamon

Method

Place all of the ingredients in a blender and blend until smooth. Add a hint of superfine sugar as needed (I did not add sugar because my grape juice was plenty sweet). Pour into popsicle molds and freeze for 6 hours or overnight. If the popsicles are difficult to remove, run the tray under warm water and wiggle until the popsicles slide out easily. Enjoy!

7.06.2011

Horseradish-Dill Crackers


Thomas and I spent Fourth of July weekend with my family at Deep Creek Lake in Maryland. I absolutely love it there because of the beautiful scenery, fresh mountain air, laidback and unpretentious attitude, and family-oriented fun. We did our fair share of boating, hiking, barbequing, drinking, and story-telling. We made the rounds between the town’s popular new brew pub, old fashioned ice cream shop, quaint coffee house, and a no-frills roadside breakfast stop.


Somehow, it seems as if time stands still in Deep Creek. I have vacationed there since I was about 5 years old – skiing in the winter and boating in the summer. Although I have witnessed more and more homes pop up and new developments emerge, Deep Creek manages to remain modest, unruffled, and traditional.


Something about that town takes me back to a simpler time. When I am not enjoying the outdoors, I have an overwhelming desire to break out the rolling pin, strap on an apron, and start baking. I decided to whip up some homemade crackers to serve as an hors d'oeuvre at our family cocktail hour. I gave them a little extra pep with the addition of horseradish and dill. These crackers are delicious when topped either with a sharp cheddar cheese or with smoked salmon and crème fraiche. They were the prefect ending to an active summer's day, as we lounged around, sipped cocktails, and enjoyed a truly memorable sunset over our favorite lake.


Horseradish-Dill Crackers Recipe

Makes about 30 crackers

Ingredients

1 stick unsalted butter
1 ¼ cups flour
1 teaspoon salt
2 teaspoons dried dill
1 ½ tablespoons horseradish (add more for extra spice)
Water


Method

Preheat oven to 350 degrees. In a large bowl, combine butter, flour, salt, dill, and horseradish with your hands. Mix together until a dough forms, adding a tablespoon or two of water if necessary. Move the dough to a floured board and roll out until about a ¼ to ½ inch thick. Place in the freezer for about 20 minutes.

Using a 2-inch cookie or biscuit cutter, cut out the crackers and place on an ungreased baking sheet. Bake for 20-22 minutes and then allow to cool.

These crackers can be a bit crumbly, so top with caution. Enjoy!